Mulesoft Connector Devkit Setup

Mulesoft connector is the backbone of mulesoft flow. It receives or sends messages between Mule and one or more external sources, such as files, databases, or Web services. It also acts as message sources by working as inbound endpoints, they can act as a message processor that performs an operation in middle of a flow, or they can fall at the end of a flow and act as the recipient of the final payload data.

Mulesoft connectors are either endpoint-based or operation-based. Endpoint-based follow one-way or request-response exchange patterns. Operation-based connectors are based on information exchange pattern.

There are number of connector available in anypoint studio but some time the connector available is not able to satisfy company specific requirement. Own connector is a good option to explore whether we need a connector with a specific functionality or want to connect to a system without a pre-built connector.

If you are building your own connector you need to setup your development environment inside your mulesoft anypoint studio.

Make sure you enable maven configuration inside your anypoint studio and install Devkit for Mulesoft connector
1. Installation and Configuration of Maven 
Steps to enable Maven setting inside Anypoint studio.

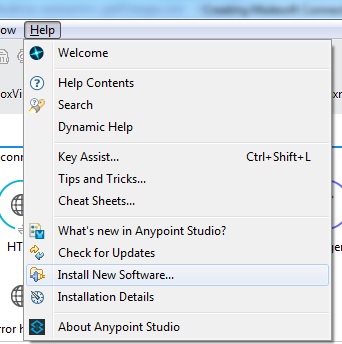
a) Studio –>Help –> Install New Software

newsoftware

b)  In Available Software window

Work with –>Anypoint Addons Update Site

anypoint_workwith

c) Now you need to select Maven Tools for Mule

anypoint_maven

d)   Click Next button and Then Finish.

This will install maven plugin into your Anypoint studio

Validate your maven plugin installation

Got to Window –> Preferences
you can find maven link under Anypoint Studio tab

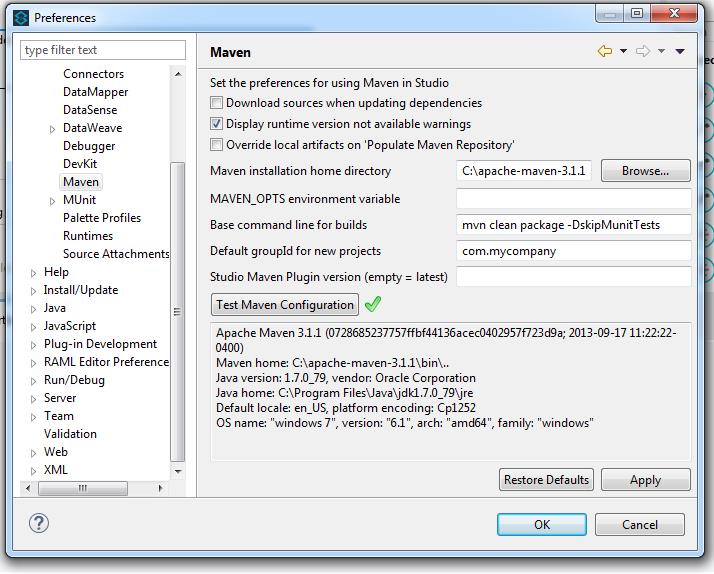
configure maven in your Anypoint studio

set maven installation directory and enter your maven command

anypoint_maven_prefrences

Click Test Maven configuration. You will get green check. Now you all set for maven configuration

2.   Installation of Anypoint Devkit Plugin
Steps to get Anypoint  DevKit Plugin

a)  Studio –>Help –>Install New Software

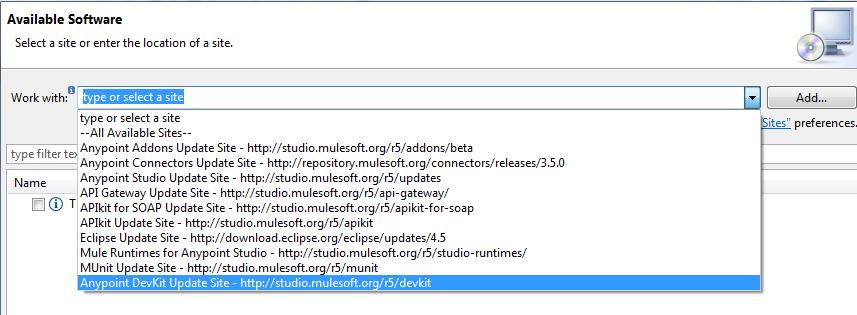
b)  In Available Software window Please select Anypoint DevKit Update site

anypoint_devkit_site

c) Now you need to select Anypoint Devkit Plugin

anypoint_devkit_site_select

d)  Click Next button and Then Finsh.

This will install Anypoint Devkit Plugin into your Anypoint studio

Validate your Devkit plugin installation

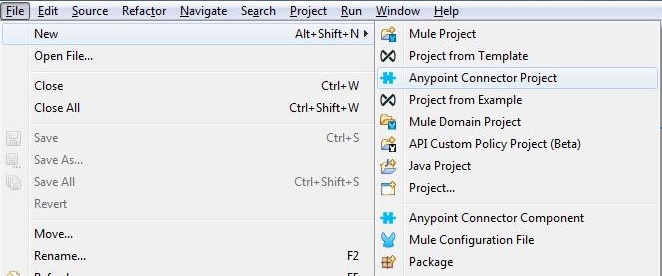
Go to  File — New in Anypoint studio

You will find two new options for Anypoint Connector

a) Anypoint Connector Project

b)Anypoint Connector Component

anypoint_devkit_install

Now you all set to develop your own connector.

In my next blog I will write how to build and deploy your own connector.


DataWeave:A New Era in Mulesoft

Dataweave is a new data mapping tool which comes with MuleSoft 3.7 run time. Before Mule 3.7 runtime, Datamapper was there for data mapping. Dataweave inherit some of the functionality from Datamapper but due to restriction of complex mapping in Datamapper, Dataweave emerged with Mulsesoft 3.7 runtime.
There are three section of Dataweave.
1) Input
2) Output
3) Data transformation language

Data transformation language is based on JSON like language. If you are familiar with JSON, it is very easy to write Dataweave transformation logic and maintain this logic.

Here are some tips to write and maintain Dataweave transformation logic.

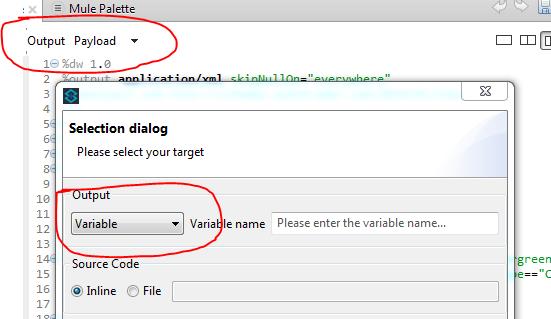
1)   Default Output of Dataweave Transformation is set into payload. But you can easily     change from dropdown and set this output as variable or session variable
dataweave

2) Output of transformed data you can easily define in Dataweave. If you are transforming data into XML you just need to define as “ %output application/xml” without touching underline transformation logic. Same way if you are transforming your data into json or any other format you just need to define output like without touching underline transformation logic as “ %output application/json”, “ %output application/java”, “ %output application/csv”..

%dw 1.0
%output application/xml
%namespace ns0 http://schemas.vanrish.com/2010/01/ldaa

3)  Dataweave transformation logic gives leverage to skip any null field during data transformation. This is only declarative. Here is declaration to skipping null fields everywhere during transformation skipNullOn=”everywhere”

%dw 1.0
%output application/xml skipNullOn=”everywhere”
%namespace ns0 http://schemas.vanrish.com/2010/01/ldaa


4)  Dataweave transformation allows to access flowVars and sessionVars directly into transformation field.

orderParameter:{
         name:“MINOR_LI_ID”,
         value:flowVars.payloadVar.minorLiId
}

5)  Dataweave transformation reads properties value directly from properties file. You can access properties value in Dataweave like you are accessing during flow.

teamName:“$($.teameName)${teamNameSuffice},
  teamNameSuffice is defined in properties file.

6)  Dataweave transformation allows implementing condition logic for each field. It is very easy to implement and transform your data based on these condition logic. Here is example to implement to condition logic for field partnershipType.

partnershipType:“NEW” when $.partnership-type==”NEW”
                            otherwise “USED” when $.partnership-type==”USED”
                            otherwise “EM” when $.partnership-type==”EM”
                            otherwise “PU” when $.partnership-type==”PU”
                            otherwise “PN” when $.partnership-type==”PN”
                            otherwise $.partnership-type,
Here is another example

creativeType:“GRAPHIC” when ($.creative-type == “GRAPHIC” or $.creative-type == null)
                         otherwise “TEMPLATED_AD” when $.creative-type == “TEMP_AD”
                         otherwise “AD_TAG” when $.creative-type == “AD_TAG”
                         otherwise “”,

7)  During Dataweave transformation logic you can call global function and transform your field based on these function output. This is one of the ways you can call java object into Dataweave transformation.

Here is example
global-functions is tag for mule-config file where you can define function for entire mule flow

<global-functions>

def toUUID() {
return java.util.UUID.randomUUID().toString()
}

def getImageType(imageName) {
return imageName.substring(imageName.lastIndexOf(‘.’)+1)
}

</global-functions>

Now you can call this function inside Dataweave transformation logic.

 imageType:getImageType($.origin-name as :string) when $.origin-name != null otherwise “”,

Mulesoft:Flow Execution Time

Mulesoft application is based on flows. Every flow has their own execution time. We can calculate this flow execution is couple of ways. But Mulesoft provides one of the easy way to calculate this flow execution time by using interceptor . Timer interceptor (<timer-interceptor/>) is one of the mule interceptor to calculate Mulesoft flow execution time.

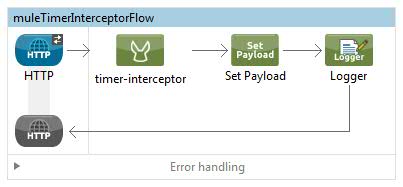
Here is flow diagram for timer-interceptor

muleTimerInterceptorFlow

Here is code for timer-interceptor to implement in your application


<?xml version="1.0" encoding="UTF-8"?>
<mule xmlns:http="http://www.mulesoft.org/schema/mule/http" xmlns="http://www.mulesoft.org/schema/mule/core" xmlns:doc="http://www.mulesoft.org/schema/mule/documentation"       xmlns:spring="http://www.springframework.org/schema/beans"       xmlns:xsi="http://www.w3.org/2001/XMLSchema-instance"       xsi:schemaLocation="http://www.springframework.org/schema/beans http://www.springframework.org/schema/beans/spring-beans-current.xsdhttp://www.mulesoft.org/schema/mule/core http://www.mulesoft.org/schema/mule/core/current/mule.xsd
http://www.mulesoft.org/schema/mule/http http://www.mulesoft.org/schema/mule/http/current/mule-http.xsd">

<http:listener-config name="HTTP_Listener_Configuration" host="0.0.0.0" port="8081" basePath="/demo" doc:name="HTTP Listener Configuration"/>

<flow name="muleTimerInterceptorFlow">
<http:listener config-ref="HTTP_Listener_Configuration" path="/" doc:name="HTTP"/>               <timer-interceptor/>
     <set-payload doc:name="Set Payload" value="Hello World"/>
<logger message="#[payload]" level="INFO" doc:name="Logger"/>
</flow>
</mule>

 <timer-interceptor/> tag display time in milliseconds.

You can customize flow execution time to replace <timer-interceptor/>  with  <custom-interceptor>.
In this custom interceptor you need to mention your custom interceptor java class.

<custom-interceptor class=”com.vanrish.interceptor.TimerInterceptor” />

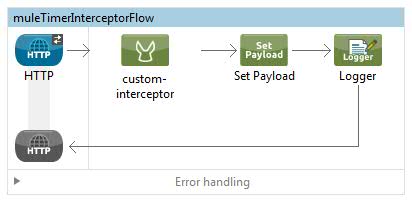
Here is flow diagram for custom timer-interceptor

muleTimerCustomInterceptorFlow

Here is mule-config.xml  code for custom timer-interceptor


<?xml version="1.0" encoding="UTF-8"?>
<mule xmlns:http="http://www.mulesoft.org/schema/mule/http" xmlns="http://www.mulesoft.org/schema/mule/core" xmlns:doc="http://www.mulesoft.org/schema/mule/documentation"       xmlns:spring="http://www.springframework.org/schema/beans"       xmlns:xsi="http://www.w3.org/2001/XMLSchema-instance"       xsi:schemaLocation="http://www.springframework.org/schema/beans http://www.springframework.org/schema/beans/spring-beans-current.xsd
http://www.mulesoft.org/schema/mule/core http://www.mulesoft.org/schema/mule/core/current/mule.xsd
http://www.mulesoft.org/schema/mule/http http://www.mulesoft.org/schema/mule/http/current/mule-http.xsd">

<http:listener-config name="HTTP_Listener_Configuration" host="0.0.0.0" port="8081" basePath="/demo" doc:name="HTTP Listener Configuration"/>

<flow name="muleTimerInterceptorFlow">

<http:listener config-ref="HTTP_Listener_Configuration" path="/" doc:name="HTTP"/>

 <custom-interceptor class="com.vanrish.interceptor.TimerInterceptor" />

<set-payload doc:name="Set Payload" value="Hello World"/>
<logger message="#[payload]" level="INFO" doc:name="Logger"/>
</flow>
</mule>

Java TimerInterceptor  code for custom timer-interceptor tag


package com.vanrish.interceptor;


import java.text.DateFormat;
import java.text.SimpleDateFormat;
import java.util.Date;
import org.mule.api.MuleEvent;
import org.mule.api.MuleException;
import org.mule.api.interceptor.Interceptor;
import org.mule.processor.AbstractInterceptingMessageProcessor;
import org.apache.commons.logging.Log;
import org.apache.commons.logging.LogFactory;

/**
* <code>TimerInterceptor</code> simply times and displays the time taken to
* process an event.

*/

public class TimerInterceptor extends AbstractInterceptingMessageProcessor

implements Interceptor {

/**

* logger used by this class

*/

private static Log logger = LogFactory.getLog(TimerInterceptor.class);

public MuleEvent process(MuleEvent event) throws MuleException {
long startTime = System.currentTimeMillis();
DateFormat dateFormat = new SimpleDateFormat("yyyy/MM/dd HH:mm:ss");
Date stdate = new Date();
String start = dateFormat.format(stdate);
System.out.println(start);

MuleEvent resultEvent = processNext(event);

Date enddate = new Date();
String end = dateFormat.format(enddate);

if (logger.isInfoEnabled()) {

long executionTime = System.currentTimeMillis() - startTime;
            logger.info("Custom Timer : "+resultEvent.getFlowConstruct().getName() + " Start at "+start+" and end at "+end +" it took " + executionTime + "ms to process event ["                   + resultEvent.getId() + "]");
}
return resultEvent;
}
}

Mulesoft Polling : A New Perspective

Mulesoft polling is one of the most important features in Mulesoft. If you are dealing with large set of data or asynchronous workflow, polling architect is one of the best options to manage this scenario.
There are two options to configure Mulesoft poll scheduling.

  1. Fixed frequency scheduler – you can define polling time in frequency, start delay and time unit. This is one of the simplest ways to define your polling.
  2. Cron scheduler – Cron scheduler gives ability to use expression language and manage complex scheduling polling.

There is no relationship between two polling. This was challenge for me to get the relationship between two polling so that I can manage my data more efficiently.

Mulesoft gives couple of options to set up relationship between two polls.

Watermark – In polling there is always challenge to process newly created data and keep persist pointer for processed data to avoid duplicate processing. Mulesoft allows us as Watermark to persist this pointer in objectstore. Mule sets a watermark to a default value the first time the flow runs, then uses it as necessary when running a query or making an outbound request. Based on flow Mule may update the original value of the watermark or maintain the original value.
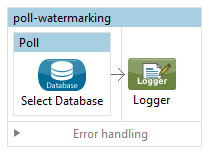
Here is simple flow to show how to implement watermark for poll

Poll Watermark Flow Diagram
poll-watermark

Here is code for this flow


<?xml version="1.0" encoding="UTF-8"?>
  <mule xmlns:schedulers="http://www.mulesoft.org/schema/mule/schedulers" xmlns:tracking="http://www.mulesoft.org/schema/mule/ee/tracking"
   xmlns:http="http://www.mulesoft.org/schema/mule/http" xmlns:mulexml="http://www.mulesoft.org/schema/mule/xml" xmlns="http://www.mulesoft.org/schema/mule/core" xmlns:doc="http://www.mulesoft.org/schema/mule/documentation"
   xmlns:spring="http://www.springframework.org/schema/beans"
   xmlns:xsi="http://www.w3.org/2001/XMLSchema-instance"
   xsi:schemaLocation="http://www.mulesoft.org/schema/mule/db http://www.mulesoft.org/schema/mule/db/current/mule-db.xsd
   http://www.springframework.org/schema/beans http://www.springframework.org/schema/beans/spring-beans-current.xsd
   http://www.mulesoft.org/schema/mule/core http://www.mulesoft.org/schema/mule/core/current/mule.xsd
   http://www.mulesoft.org/schema/mule/http http://www.mulesoft.org/schema/mule/http/current/mule-http.xsd
   http://www.mulesoft.org/schema/mule/xml http://www.mulesoft.org/schema/mule/xml/current/mule-xml.xsd
   http://www.mulesoft.org/schema/mule/ee/tracking http://www.mulesoft.org/schema/mule/ee/tracking/current/mule-tracking-ee.xsd
   http://www.mulesoft.org/schema/mule/schedulers http://www.mulesoft.org/schema/mule/schedulers/current/mule-schedulers.xsd">
  <spring:beans>
     <spring:bean id="dataSourceBean" name="dataSource_Bean" class="org.apache.commons.dbcp.BasicDataSource">
       <spring:property name="driverClassName" value="com.microsoft.sqlserver.jdbc.SQLServerDriver"/>
       <spring:property name="username" value="********"/>
       <spring:property name="password" value="********* "/>
       <spring:property name="url" value="jdbc:jtds:sqlserver://localhost:60520;Instance=CRM;DatabaseName=vanrish;domain=man;integrated security=false"/>
    </spring:bean>
 </spring:beans>
  <db:generic-config name="Generic_Database_Configuration" dataSource-ref="dataSourceBean" doc:name="Generic Database Configuration" >
     <reconnect-forever frequency="30000"/>
  </db:generic-config>
<flow name="poll-watermarking" processingStrategy="synchronous">
  <poll doc:name="Poll">
    <schedulers:cron-scheduler expression="0 22 12 * * ?"/>
    <watermark variable="serialNumber" default-expression="0" selector="LAST" selector-expression="#[payload.serialNumber]"/>
    <db:select config-ref="Generic_Database_Configuration" doc:name="Select Database">
       <db:dynamic-query><![CDATA[SELECT
MessageId, MessageType,SerialNumber,CreatedOn  FROM Message where SerialNumber  > #[Integer.parseInt(flowVars['serialNumber'])] order by SerialNumber asc]]></db:dynamic-query>
    </db:select>
 </poll>
   <logger message="#[flowVars['serialNumber']] == Hello this is Loggin Message == #[payload]" level="INFO" doc:name="Logger"/>
  </flow>
</mule>

Idempotent Filter – Idempotent filter is another way in Mule we can keep track between two polling. This filter ensures that only unique messages are received by a service by checking the unique ID of the incoming message. This filter also store unique id/pointer in objectstore in mule.
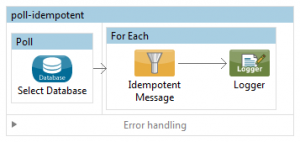
Here is simple flow to use Idempotent Filter

Poll Idempotent Filter flow Diagram
poll-idempotent

idempotent-objectStore

Here is code

<?xml version="1.0" encoding="UTF-8"?>
<mule xmlns:schedulers="http://www.mulesoft.org/schema/mule/schedulers" xmlns:tracking="http://www.mulesoft.org/schema/mule/ee/tracking" xmlns:db="http://www.mulesoft.org/schema/mule/db"
  xmlns:cassandradb="http://www.mulesoft.org/schema/mule/cassandradb" xmlns:http="http://www.mulesoft.org/schema/mule/http" xmlns:json="http://www.mulesoft.org/schema/mule/json" xmlns:mulexml="http://www.mulesoft.org/schema/mule/xml" xmlns="http://www.mulesoft.org/schema/mule/core" xmlns:doc="http://www.mulesoft.org/schema/mule/documentation"
  xmlns:spring="http://www.springframework.org/schema/beans"
  xmlns:xsi="http://www.w3.org/2001/XMLSchema-instance"
  xsi:schemaLocation="http://www.mulesoft.org/schema/mule/db http://www.mulesoft.org/schema/mule/db/current/mule-db.xsd
  http://www.springframework.org/schema/beans http://www.springframework.org/schema/beans/spring-beans-current.xsd
  http://www.mulesoft.org/schema/mule/core http://www.mulesoft.org/schema/mule/core/current/mule.xsd
  http://www.mulesoft.org/schema/mule/http http://www.mulesoft.org/schema/mule/http/current/mule-http.xsd
  http://www.mulesoft.org/schema/mule/xml http://www.mulesoft.org/schema/mule/xml/current/mule-xml.xsd
  http://www.mulesoft.org/schema/mule/ee/tracking http://www.mulesoft.org/schema/mule/ee/tracking/current/mule-tracking-ee.xsd
  http://www.mulesoft.org/schema/mule/schedulers http://www.mulesoft.org/schema/mule/schedulers/current/mule-schedulers.xsd">
    <spring:beans>
      <spring:bean id="dataSourceBean" name="dataSource_Bean" class="org.apache.commons.dbcp.BasicDataSource">
        <spring:property name="driverClassName" value="com.microsoft.sqlserver.jdbc.SQLServerDriver"/>
        <spring:property name="username" value="*******"/>
        <spring:property name="password" value="********"/>
        <spring:property name="url" value="jdbc:jtds:sqlserver://localhost:60520;Instance=CRM;DatabaseName=vanrish;domain=man;integrated security=false"/>
      </spring:bean>
    </spring:beans>
    <db:generic-config name="Generic_Database_Configuration" dataSource-ref="dataSourceBean" doc:name="Generic Database Configuration" >
      <reconnect-forever frequency="30000"/>
    </db:generic-config>
    <flow name="poll-idempotent" processingStrategy="synchronous">
      <poll doc:name="Poll">
        <fixed-frequency-scheduler frequency="10000"/>
        <db:select config-ref="Generic_Database_Configuration" doc:name="Select Database">
          <db:dynamic-query><![CDATA[SELECT  MessageId, MessageType,SerialNumber,CreatedOn  FROM Message order by SerialNumber asc]]></db:dynamic-query>
        </db:select>
      </poll>
      <foreach doc:name="For Each">
        <idempotent-message-filter idExpression="#[payload.SerialNumber]" doc:name="Idempotent Message">
          <in-memory-store entryTTL="120000" expirationInterval="1800000"/>
        </idempotent-message-filter>
        <logger message="#[payload.SerialNumber] == Hello this is Loggin Message == #[payload]" level="INFO" doc:name="Logger"/>
      </foreach>
    </flow>
  </mule>

MuleSoft Security – Encryption

Security is about protecting your assets. These assets could be anything in company. Please refer to my previous blog about  what-is-security.

Mulesoft provides security suite to protect company assets. This suite of security features provides various methods for applying security to Mule Service-Oriented Architecture (SOA) implementations and Web services. Mulesoft security suits are available in enterprise version of Mulesoft.

In this blog I am showing, how to use Encryption and Decryption from Mulesoft Security suits. Mule can encrypt an entire payload or several fields of data within a message. This encryption prevents unauthorized access of data like password, SSN, credit card… etc. and moves this data between systems securely.

Mule Message Encryption processor changes the payload or Message so that it becomes unreadable by unauthorized entities. Mule Encryption processor encrypts the payload using one of the following three Encryption Strategies

1) JCE Encrypter — encrypts stream, byte[] or string
2) XML Encrypter — encrypts string, encrypts individual fields using xpath expressions.
3) PGP Encrypter — encrypts stream, byte[] or string, applies tighter security (relative to JCE and XML), increases processing load (relative to JCE and XML)

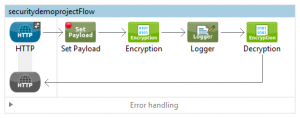
Encryption-Decryption Flow Diagram
securitydemoproject
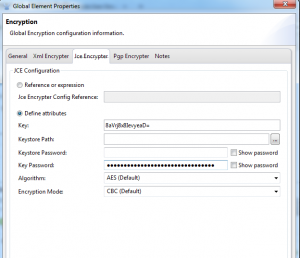
Encryption Connector Configuration
In my example I am using Jce Encrypter. I am setting value for key and keypassword
encryption_connector
Here is full code of this implementation


<?xml version="1.0" encoding="UTF-8"?>
<mule xmlns:encryption="http://www.mulesoft.org/schema/mule/encryption" 
xmlns:http="http://www.mulesoft.org/schema/mule/http" 
xmlns="http://www.mulesoft.org/schema/mule/core" 
xmlns:doc="http://www.mulesoft.org/schema/mule/documentation"       
xmlns:spring="http://www.springframework.org/schema/beans" version="EE-3.7.0"       
xmlns:xsi="http://www.w3.org/2001/XMLSchema-instance"       
xsi:schemaLocation="http://www.springframework.org/schema/beans 
http://www.springframework.org/schema/beans/spring-beans-current.xsd
http://www.mulesoft.org/schema/mule/core http://www.mulesoft.org/schema/mule/core/current/mule.xsd
http://www.mulesoft.org/schema/mule/http http://www.mulesoft.org/schema/mule/http/current/mule-http.xsd
http://www.mulesoft.org/schema/mule/encryption http://www.mulesoft.org/schema/mule/encryption/current/mule-encryption.xsd">

  <http:listener-config name="HTTP_Listener_Configuration" host="0.0.0.0" port="8081" basePath="/demo" doc:name="HTTP Listener Configuration"/>
  <encryption:config name="Encryption" doc:name="Encryption">
    <encryption:jce-encrypter-config key="8aVrj8x8IevyeaD=" keyPassword="0Zb+smauaT8v6hRiFGJDnakwlS/YC2u="/>    </encryption:config>

  <flow name="securitydemoprojectFlow">

    <http:listener config-ref="HTTP_Listener_Configuration" path="/" doc:name="HTTP"/>

    <set-payload value="Hello World" doc:name="Set Payload"/>

    <encryption:encrypt config-ref="Encryption" doc:name="Encryption" using="JCE_ENCRYPTER">

      <encryption:jce-encrypter key="8aVrj8x8IevyeaD=" algorithm="AES" encryptionMode="CBC" keyPassword="0Zb+smauaT8v6hRiFGJDnakwlS/YC2u="/>

    </encryption:encrypt>

    <logger message=" Encrypted Message ==#[payload]" level="INFO" doc:name="Logger"/>

    <encryption:decrypt config-ref="Encryption" doc:name="Decryption" using="JCE_ENCRYPTER">

      <encryption:jce-encrypter key="8aVrj8x8IevyeaD=" keyPassword="0Zb+smauaT8v6hRiFGJDnakwlS/YC2u=" algorithm="AES" encryptionMode="CBC"/>

    </encryption:decrypt>
  </flow>
</mule>

Mulesoft Parallel processing-2 (Splitter,Collection Splitter, Chunk Splitter)

I described in my previous blog about parallel processing, in this blog also I am continuing my previous blog but adding new flavor of parallel processing in Mulesoft.
Splitter flow control splits a message into separate fragments and then sends these fragments parallel and concurrent to the next message processor in the flow. Segments are identified based on an expression parameter, usually written in Mule Expression Language (MEL), but other formats can be employed also. There are three ways we can spilt Mulesoft message.

Splitter — Splitter can split all types of data like Object, XML, JSON, and Payload based on MEL (Mule expression language) and processes each split into individual thread. .

Collection Splitter – If input type is collection, then collection splitter split data based on collection and process each element in individual thread.

Chunk Splitter – Chunk of splitter spilts message into chunk of bytes based on user input and processes each chunk of bytes in individual thread.

Since Collection splitter is one of the most usable splitter in Mulesoft. So I am showing example about Collection splitter.
In this example HasMap is coming as payload. Collection Splitter splits HasMap into different threads (limiting max 50 threads) and processes these threads in parallel.

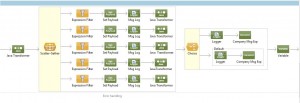
 Flow diagrame to implement parallel processing through Mulesoft Collection Splitter
splitter

Mulesoft code for parallel processing (Splitter)

<flow name="Vanrish-processFlow" processingStrategy="allow50Threads">

    <logger message="*** Starting Vanrish-processFlow ***" category="edi-vanrish-process" level="INFO" doc:name="Flow Start Log"/>

    <set-payload value="#[map-payload:processing]" doc:name="Payload Processing"/>
    <set-variable variableName="numberOfMessages" value="#[payload.entrySet().size()]" doc:name="Variable"/>
    <logger message="Processing #[flowVars['numberOfMessages']] entities" level="INFO" doc:name="logger-status go to database"/>
    <splitter doc:name="Collection Splitter" expression="#[payload.entrySet()]"/>
    <vm:outbound-endpoint exchange-pattern="one-way" path="VanrishVM" doc:name="VM"/>

    <logger message="*** Ending Vanrish-processFlow ***" category="edi-Vanrish-process" level="INFO" doc:name="Flow End Log"/>
</flow>

<flow name="Vanrish_Splitter_Demo" processingStrategy="allow50Threads">
    <vm:inbound-endpoint exchange-pattern="one-way" path="VanrishVM" doc:name="VM"/>
    <logger message="Company Canonical Start Time -&gt; #[server.dateTime]" level="INFO" doc:name="Company Logger"/>
    <flow-ref name="vanrishMsgPrivateFlow" doc:name="companyMsgPrivateFlow"/>
</flow>

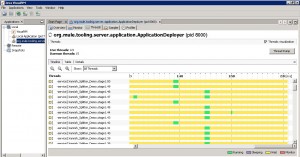
Java Profiler is to show how Mulesoft Splitter splits collection message into multiple threads and process data
splitter-profiler

Mulesoft Parallel processing (Scatter-Gather)

There is always a bottleneck of application when application is being read or written to multiple sources. Application always takes more time to process.
Parallel processing techniques can help reduce the time it takes to process a solution and make application fast.

So what is parallel processing?
   Parallel processing is a form of process in which many process are carried out simultaneously, operating on the principle that large problems can often be divided into smaller ones, which are then solved at the same time

Mule introduces Scatter-Gather processor to implement parallel processing.  <All> message processor replaced by scatter-Gather in Mule 3.5 version with more feature. Scatter-Gather router sends a message for concurrent processing to all configured routes. It uses a thread pool to concurrently execute all routes. This means that the total time the caller thread needs to be waiting for routes to respond is no longer the sum of all route’s time, but just the longest of them. If there are no failures, Mule aggregates the results from each of the routes into a message collection. If any exception comes during Scatter-Gather process it throws a CompositeRoutingException, which maps each exception to its corresponding route.

 Flow diagrame to implement parallel processing for mule application

scatter-gather

Mule code for parallel processing (scatter-Gather)

<custom-transformer class="com.vanrish.transformer.GenerateMessageTransformer" doc:name="Java Transformer"/>
  <scatter-gather doc:name="Scatter-Gather">
    <processor-chain>
      <expression-filter expression="#[flowVars.COM != null]" doc:name="Expression Filter"/>
      <set-payload value="#[flowVars.COM]" doc:name="Set Payload"/>
      <logger message="Msg =&gt; #[payload.message]" level="DEBUG" doc:name="Msg Log"/>
      <custom-transformer class="com. vanrish.transformer.ComTransformer" doc:name="Java Transformer"/>    
    </processor-chain>
    <processor-chain>
      <expression-filter expression="#[flowVars.CON != null]" doc:name="CON Expression Filter"/>
      <set-payload value="#[flowVars.CON]" doc:name="Set Payload"/>
      <logger message="Msg =&gt; #[payload.message]" level="DEBUG" doc:name="Msg Log"/>
      <custom-transformer class="com.vanrish. transformer.ConTransformer" doc:name="Java Transformer"/>    
    </processor-chain>
    <processor-chain>
      <expression-filter expression="#[flowVars.CBA != null]" doc:name="CBA Expression Filter"/>
      <set-payload value="#[flowVars.CBA]" doc:name="Set Payload"/>
      <logger message="Msg =&gt; #[payload.message]" level="DEBUG" doc:name="Msg Log"/>
      <custom-transformer class="com. vanrish.transformer.CbaTransformer" doc:name="Java Transformer"/>    
    </processor-chain>
    <processor-chain&gt
      <expression-filter expression="#[flowVars.IDF != null]" doc:name="IDF Expression Filter"/>
      <set-payload value="#[flowVars.IDF]" doc:name="Set Payload"/>
      <logger message="IDF =&gt; #[payload.message]" level="DEBUG" doc:name="Msg Log"/>
      <custom-transformer class="com. vanrish.transformer.IdfTransformer" doc:name="Java Transformer"/>
    </processor-chain>
    <processor-chain>
      <expression-filter expression="#[flowVars.CCI != null]" doc:name="Expression Filter"/>
      <set-payload value="#[flowVars.CCI]" doc:name="Set Payload"/>
      <logger message="#[payload.message]" level="DEBUG" doc:name="Msg Log"/>
      <custom-transformer class="com. vanrish.transformer.CciTransformer" doc:name="Java Transformer"/>    
    </processor-chain>
  </scatter-gather>
  <choice doc:name="Choice">
    <when expression="#[payload is List]">
      <logger level="INFO" message="i am list" doc:name="Logger"/>
      <expression-component doc:name="Company Msg Exp"><![CDATA[payload=app.dserializeObjectToXML(message.payload[0]));]]></expression-component>
    </when>
    <otherwise>
      <logger message="CompanyMsg class" level="INFO" doc:name="Logger"/>
      <expression-component doc:name="Company Msg Exp"><![CDATA[payload=app.dserializeObjectToXML(message.payload));]]></expression-component>
    </otherwise>
   </choice>
  <set-variable variableName="messageType" value="Company" doc:name="Variable"/>

Mulesoft integration with MongoDB (NOSQL)

Mulesoft with MongoDB is one of the best combinations for big data processing.  MongoDB is leading open source NoSQL database and Mule Soft is leading open source ESB.  This blog is dedicated to integration of Mulesoft with MongoDB .

Installation and configuration of MongoDB

Install MongoDB in your system. I am using window installation of mongoDB. I installed mongoDB 3.0 in my C:\ MongoDB folder. I created data folder to store MongoDB data in C:\data.
start MongoDB server with command

> \MongoDB\Server\3.0\bin\mongod.exe" --dbpath  \ data

MongoDB server started in port –27017 and userId—admin

Now download test data from MongoDB website
 https://raw.githubusercontent.com/mongodb/docs-assets/primer-dataset/dataset.json 
save this to a file named primer-dataset.json.

Import this data into MongoDB with test instance
>  mongoimport --db test --collection restaurants --drop --file \temp\primer-dataset.json
Start mongo editor to test loaded data  
 > MongoDB\Server\3.0\bin\mongo.exe
Run this command to test your database is configured
 > db.restaurants.find().count() 
This will return result.

Configuration of MongoDB connector in Mulesoft

Now configure MongoDB connection in Mule. I am using Mule 3.7
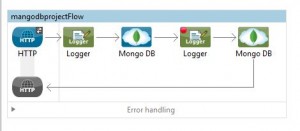
I created small Mule flow to work with MongoDB integration with Mule. This flow getting http request to get data from MongoDB and sending those data in json object.

managoDBFlow

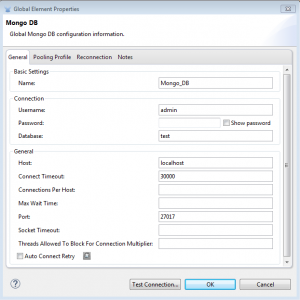
MongoDB connection configuration screenshot
mangoConfig

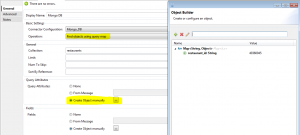
Now we have restaurants collection in MongoDB , So I use collection  as restaurants.To execute condition query I am using operation – Find object using query map

In Query Attributes I am using  — Create Object manuallybuilder

Here is full code of this implementation

       <?xml version="1.0" encoding="UTF-8"?>

<mule xmlns:json="http://www.mulesoft.org/schema/mule/json" xmlns:mongo="http://www.mulesoft.org/schema/mule/mongo" xmlns:http="http://www.mulesoft.org/schema/mule/http" xmlns="http://www.mulesoft.org/schema/mule/core" xmlns:doc="http://www.mulesoft.org/schema/mule/documentation"
	xmlns:spring="http://www.springframework.org/schema/beans" version="EE-3.7.0"
	xmlns:xsi="http://www.w3.org/2001/XMLSchema-instance"
	xsi:schemaLocation="http://www.springframework.org/schema/beans http://www.springframework.org/schema/beans/spring-beans-current.xsd
http://www.mulesoft.org/schema/mule/core http://www.mulesoft.org/schema/mule/core/current/mule.xsd
http://www.mulesoft.org/schema/mule/http http://www.mulesoft.org/schema/mule/http/current/mule-http.xsd
http://www.mulesoft.org/schema/mule/mongo http://www.mulesoft.org/schema/mule/mongo/current/mule-mongo.xsd
http://www.mulesoft.org/schema/mule/json http://www.mulesoft.org/schema/mule/json/current/mule-json.xsd">
    <http:listener-config name="HTTP_Listener_Configuration" host="0.0.0.0" port="8081" basePath="/mongo" doc:name="HTTP Listener Configuration"/>
    <mongo:config name="Mongo_DB" database="test" doc:name="Mongo DB" username="admin"/>
    <flow name="mongodbprojectFlow">
        <http:listener config-ref="HTTP_Listener_Configuration" path="/mongoproject" doc:name="HTTP"/>
        <logger message="This is Http Request and Response" level="INFO" doc:name="Logger"/>
        <mongo:find-objects-using-query-map config-ref="Mongo_DB" doc:name="Mongo DB" collection="restaurants" >
        	<mongo:query-attributes>                
            	<mongo:query-attribute key="restaurant_id">40360045</mongo:query-attribute>
        	</mongo:query-attributes>
        	<mongo:fields>
            	<mongo:field>name</mongo:field>
            	<mongo:field>cuisine</mongo:field>
            	<mongo:field>borough</mongo:field>
        </mongo:fields>
        </mongo:find-objects-using-query-map>
        <mongo:mongo-collection-to-json doc:name="Mongo DB"/>
        <json:object-to-json-transformer doc:name="Object to JSON"/>
    </flow>
</mule>

REST API Descriptive Language (API DL)

Rest (Representational State Transfer) webservice style is getting widespread acceptance across the Web fraternity. Industries and software communities are looking alternative to SOAP and WSDL based webservice. To compete with SOAP and WSDL based webservice REST need to support Descriptive Language based API.

Webservices APIs that follow and apply to the REST architectural constraints are called RESTful APIs. API descriptive language need to include blueprint of service, contract of service, metadata of service and documentation of service.

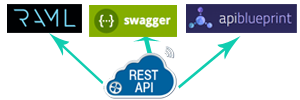
Many REST API descriptive language (API DL) are available today. Here I am discussing top 3 active API DL available for REST.

restapi

RAML — RAML is sponsored by MuleSoft. RAML Built on broadly used standards such as YAML and JSON, written in CoffeeScript, and can be used as a node.js. This is one of the very famous API DL and widely use with MuleSoft ESB. RAML support blueprint and contract of service design before you start your original coding. RAML API design approach is top-down. Writing spec for RAML is simple, human readable format.

SWAGGER – Sawwagger is sponsored by couple of companies like Apigee, Reverb and supported  with a large number active developer communities. Swaager format is based on JSON but they also support YAML. Swagger right now doesn’t support design before code. SWAGGER API design approach is bottom-up. Writing spec for SWAGGER  looks incomplete.

API Blueprint – API blueprint is sponsored by Apiary.API blueprint is based on Markdown. Markdown is a text-to-HTML conversion tool for web writers. There is no active developer community support for API Blueprint. API Blueprint right now doesn’t support design before code and its design approach is top-down. Writing spec for API Blueprint is simple and easy.

New Feature of Mule ESB 3.6 released and Anypoint studio

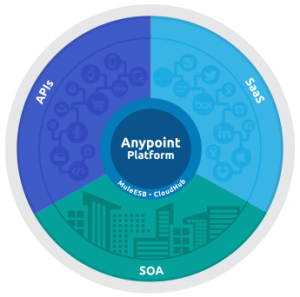
Mule ESB is one of the leading open sources ESB in market. Mule ESB product is maturing every day. Recently it released new version of Mule 3.6 and Anypoint studio January 2015 to support development for Mule 3.6 released. This release of mule adopts design-first and resource based approach. With this release user can quickly connect and design API based on a new HTTP connector.anypoint-platform-release
Here is quick view of some of enhancement with Mule 3.6
1. New Http connector – New http connector is more resource centric, simpler to use and allow using RAML specs.
2. Shared Resources – New released support shared resources allow to share connector across multiple project and application. This is managed by new project inside Mule editor called Domain.
3. Continuous Integration enhancement — This release features a powerful new agent that provides access to MuleSoft’s runtime API for integrating with existing continuous integration processes and SDLC tools like Jenkins
4. New Support for Microsoft – Sharepoint and Dynamics CRM are two new connectors to integrate with Microsoft services.
5. AMQP 0.9 connector – This connector is now officially part of Mule soft connector. It is built on top of the previously-available community AMQP transport, and includes support for multi-channel receivers